> For the complete documentation index, see [llms.txt](https://docs.allout.game/llms.txt). Markdown versions of documentation pages are available by appending `.md` to page URLs; this page is available as [Markdown](https://docs.allout.game/using-the-editor/terrain.md).
# Terrain
The terrain system lets you paint large, seamless ground surfaces using up to four blended texture layers and an optional water overlay.
## Adding a Terrain
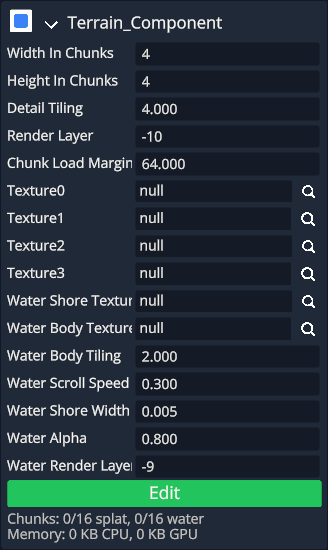
Add a `Terrain_Component` to any entity. The terrain is centered on the entity's position and spans a grid of chunks, each covering 32×32 world units.
## Terrain Properties
| Property | Description |
| ---------------------------- | --------------------------------------------------------------------------------------------------------- |
| **Width / Height in Chunks** | Size of the terrain grid. Each chunk is 32×32 world units, so a 4×4 terrain covers 128×128 units. |
| **Detail Tiling** | How many times each ground texture repeats across a single chunk. Higher values = more detail repetition. |
| **Render Layer** | Controls draw order relative to other sprites and terrain. Lower values draw behind. |
| **Chunk Load Margin** | Extra distance (in world units) beyond the camera view at which chunks are loaded. |
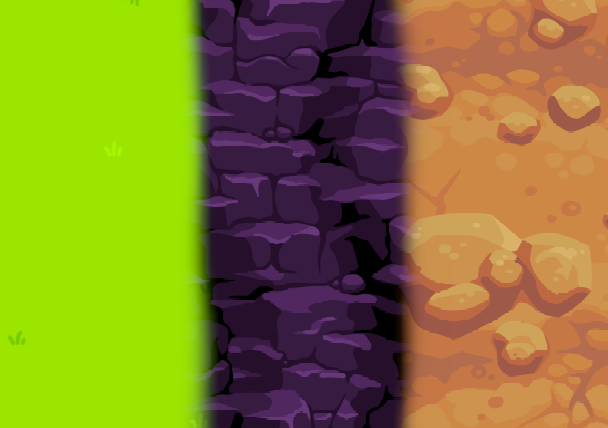
| **Texture 0–3** | The four ground texture layers. Each channel of the splat map (R, G, B, A) corresponds to one texture. |
## Editing Mode
Select the terrain entity and click the **Edit** button in the inspector to enter terrain editing mode. Click **Cancel** to exit.
While editing, you can paint directly in the scene view using the brush settings below.
## Brush Settings
| Setting | Description |
| -------------------- | --------------------------------------------------------------------------------------------------------------------------------- |
| **Brush Radius** | Size of the circular brush in world units. |
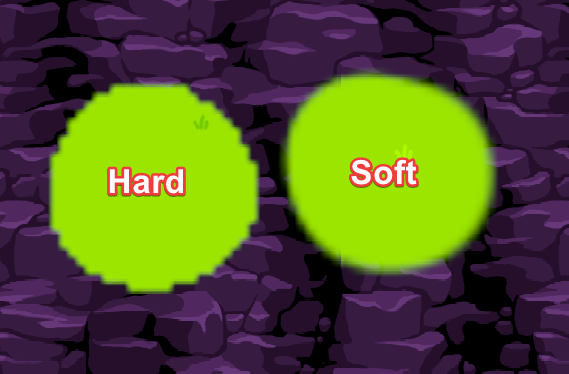
| **Brush Hardness** | Controls falloff. At 1.0 the brush is a hard circle with no feathering. Lower values produce a soft gradient from center to edge. |
| **Brush Strength** | How strongly a soft texture stroke applies. At full hardness, texture paint overwrites the pixel and ignores strength. |
| **Selected Channel** | Which texture layer to paint (0–3 corresponding to Texture 0–3, or 4 for water). |
| **Erase Mode** | When enabled, painting removes the selected texture layer instead of applying it. |
## Painting Terrain Textures
Painting works by modifying a per-chunk 256×256 splat map. Each pixel stores four channel weights (RGBA) that blend between Texture 0–3.
* **Click and drag** to paint along a line. The brush stamps at regular intervals along your stroke.
* **Soft blending** gradually increases the target channel while proportionally reducing others, preserving smooth transitions.
* **Hard overwrite** (at full hardness) sets the target channel to 100% and all others to 0%.
* **Erase** reduces the selected channel, letting underlying textures show through.
Chunks are **allocated lazily** — empty chunks consume no memory until you first paint on them.
## Water Layer
The terrain also supports a paintable water overlay with its own set of properties:
| Property | Description |
| ----------------------- | ------------------------------------------------------------ |
| **Water Body Texture** | The main scrolling water texture. |
| **Water Shore Texture** | Texture applied at the edges of water areas. |
| **Water Body Tiling** | Repetition of the water texture. |
| **Water Scroll Speed** | How fast the water texture scrolls. |
| **Water Shore Width** | Width of the shore transition band. |
| **Water Alpha** | Opacity of the water overlay. |
| **Water Render Layer** | Draw order for the water layer (default: one above terrain). |
Water uses a single-channel mask instead of the four texture channels. Select channel 4 to paint it. The water brush uses a fixed soft falloff and partial opacity; hardness and strength are hidden. Box fill writes fully opaque water. Erase targets zero opacity.
## Box Fill
In addition to the circular brush, terrain and water can be filled using an axis-aligned box selection. Box fill always uses hard overwrite — useful for quickly covering large rectangular regions with a single texture or filling/clearing water areas.
## Memory & Performance
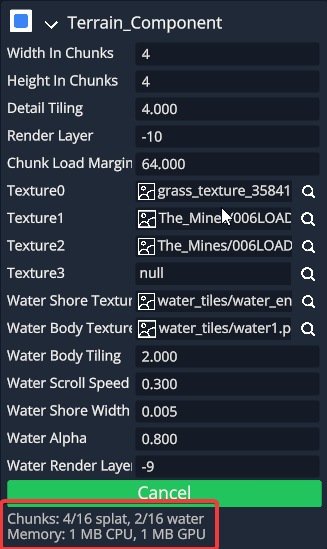
The inspector shows a debug readout at the bottom of the terrain section:
* **Chunks**: How many chunks have allocated splat/water data out of the total grid.
* **Memory**: Estimated CPU and GPU memory usage.
Only chunks you've painted on consume memory. Splat and water data are LZ4-compressed for serialization, so file sizes stay small even for large terrains.
## Tips
* Start with a low brush strength (0.1–0.3) for natural-looking blends between texture layers.
* Use a large, soft brush for broad base coverage, then switch to a smaller, harder brush for detail edges.
* Use `1`–`4` to select a texture channel and `5` for water.
* Use `[` and `]` to change brush radius.
* Hold **Shift** and click to paint a straight line from the previous stroke.
* Hold **Ctrl** and drag for box fill.
* Keep chunk counts reasonable. A fully painted 16×16 terrain uses about 64 MiB of GPU splat-map memory. A fully allocated water mask adds about 16 MiB.