Navmeshes
Navmeshes are used for pathfinding and movement constraints in your game. They define walkable areas for NPCs, enemies, or any entity that needs to navigate the game world. The navmesh system consists of two main components: Navmesh and Navmesh_Loop.
Components Overview
Navmesh Component
The Navmesh component is the main container for your navigation mesh. It handles:
- Triangulation of the defined area
- Pathfinding queries
- Closest point queries
Navmesh_Loop Component
The Navmesh_Loop component defines the boundaries of walkable areas. Key features:
- Defines a polygon through a series of points
- Can be flipped inside-out to create holes/obstacles
- Automatically updates parent navmesh when modified
Editor Usage
- Create an entity and add a
Navmeshcomponent to it - Create child entities with
Navmesh_Loopcomponents to define walkable areas - For each
Navmesh_Loop- Add points to define the polygon shape
- Set
FlipInsideOutsideto true if defining an obstacle/hole - The loop will automatically update the parent navmesh
- The different collider types can also be configured to create navmesh loops using
Collider.MakeNavmeshLoopandCollider.FlipNavmeshLoop. But beware thatNavmeshdoes not keep track of colliders that are punching holes in it, so it will not automatically rebuild if you modify colliders that haveMakeNavmeshLoopset to true.- You can disable colliders contributing to a navmesh by setting
Navmesh.IgnoreCollidersto true. You might want to do this for performance reasons, particularly when stitching together navmeshes which we will talk about later. See Ignore Colliders on Parent Navmesh.
- You can disable colliders contributing to a navmesh by setting
- Use
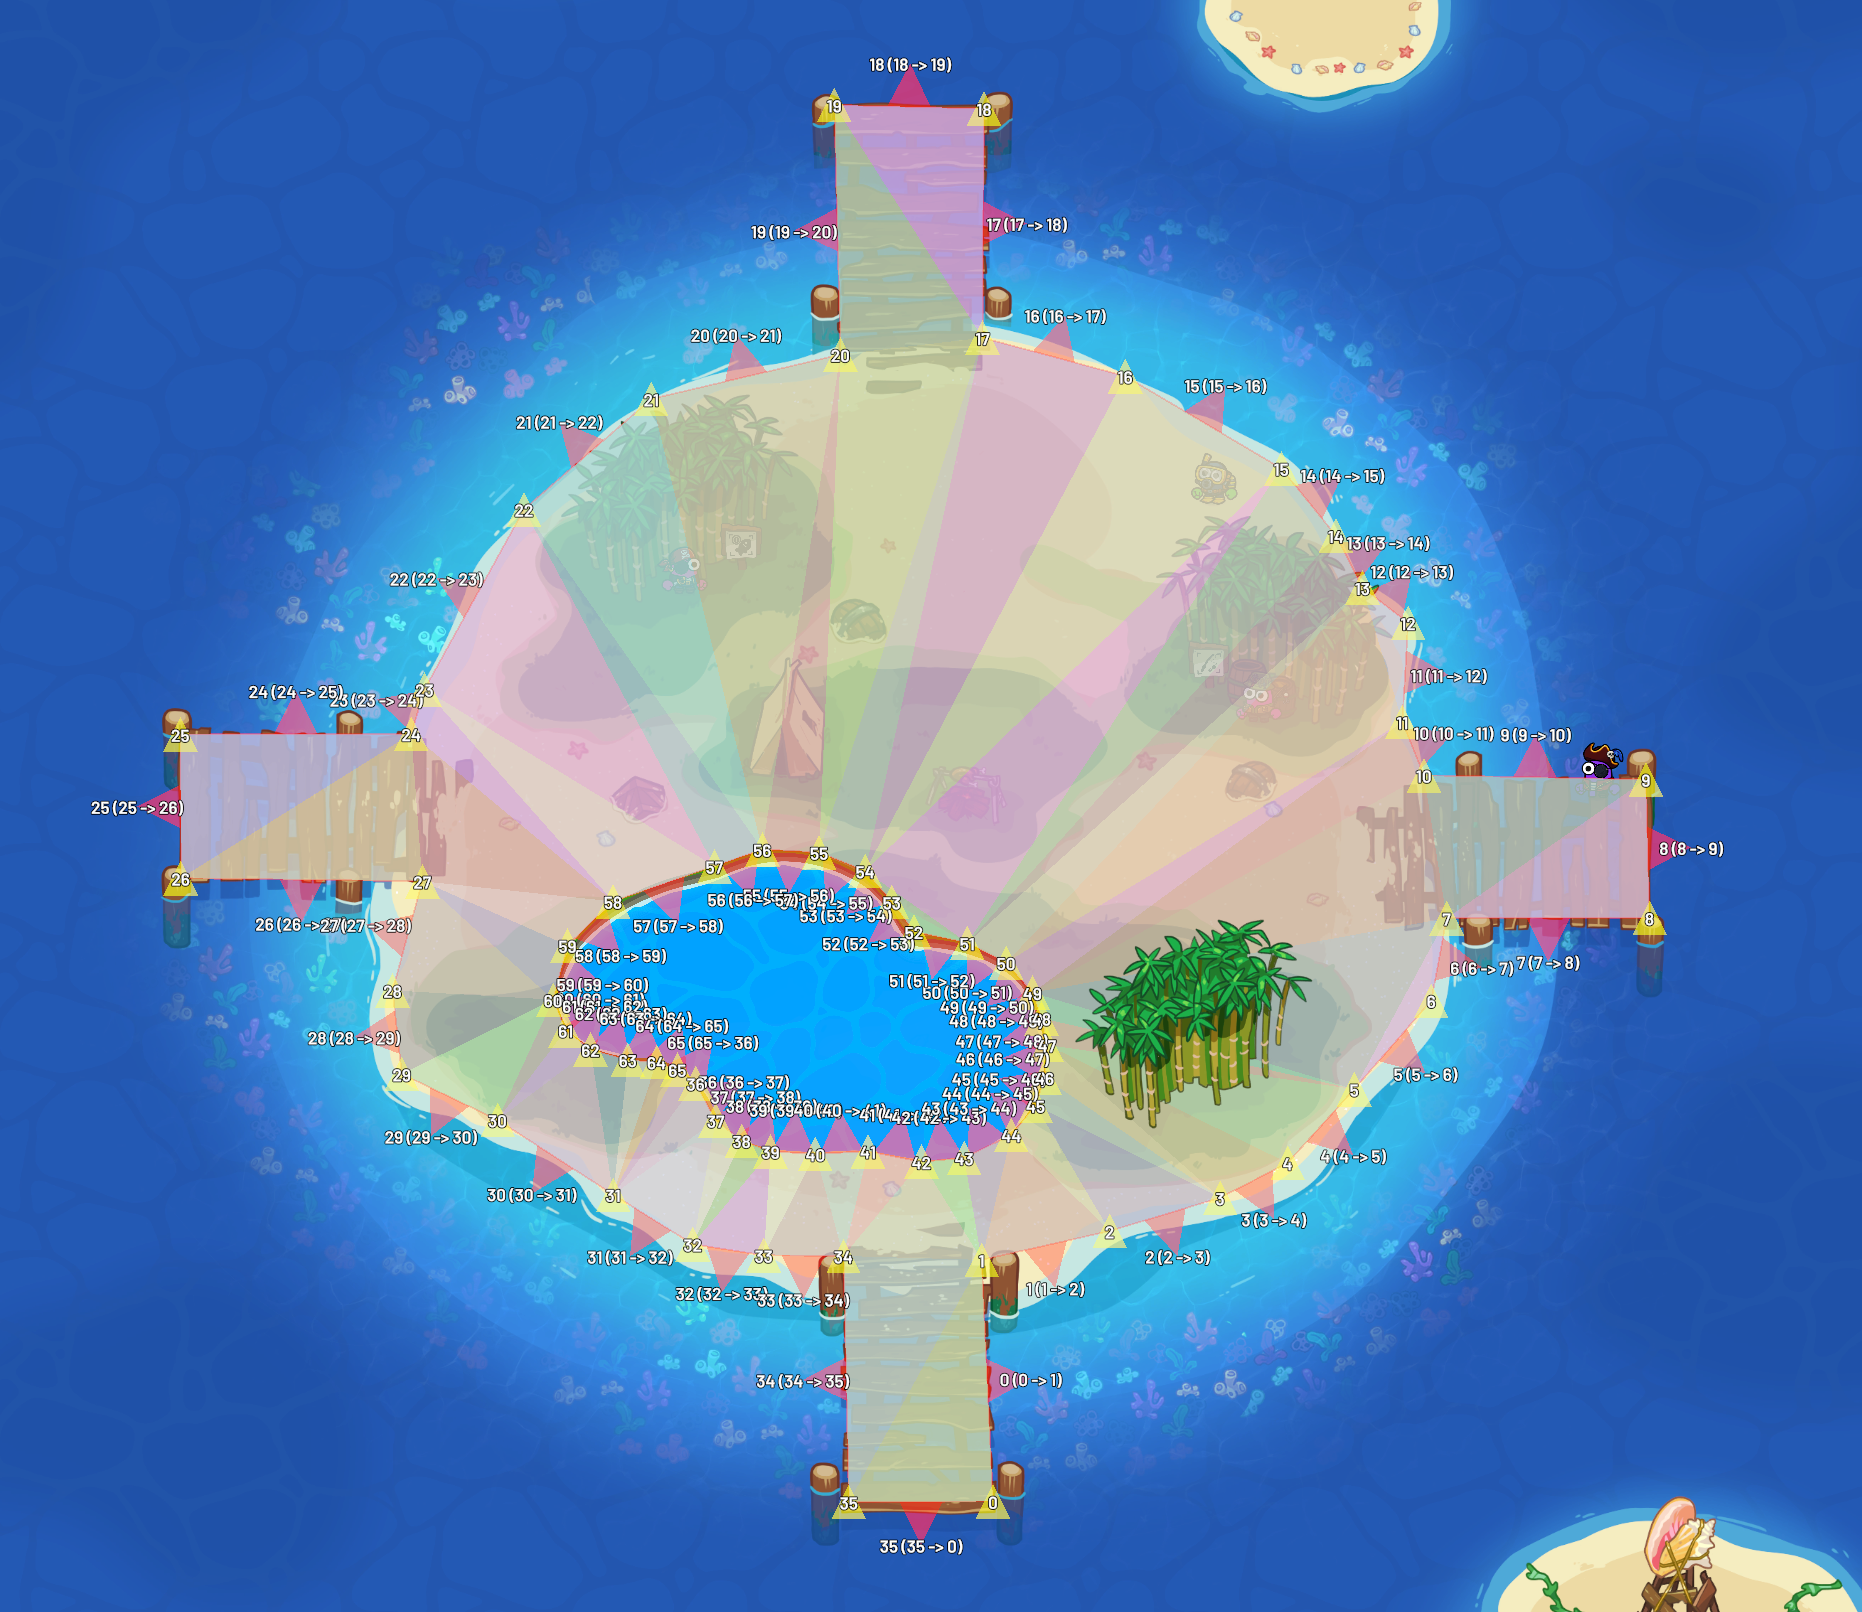
Navmesh.debug_enabledandNavmesh.debug_rebuild_every_framein the inspector to visualize your navmesh.Navmesh.debug_rebuild_every_frameshould only be necessary when using colliders. ModifyingNavmesh_Loops should automatically trigger a rebuild in all cases.

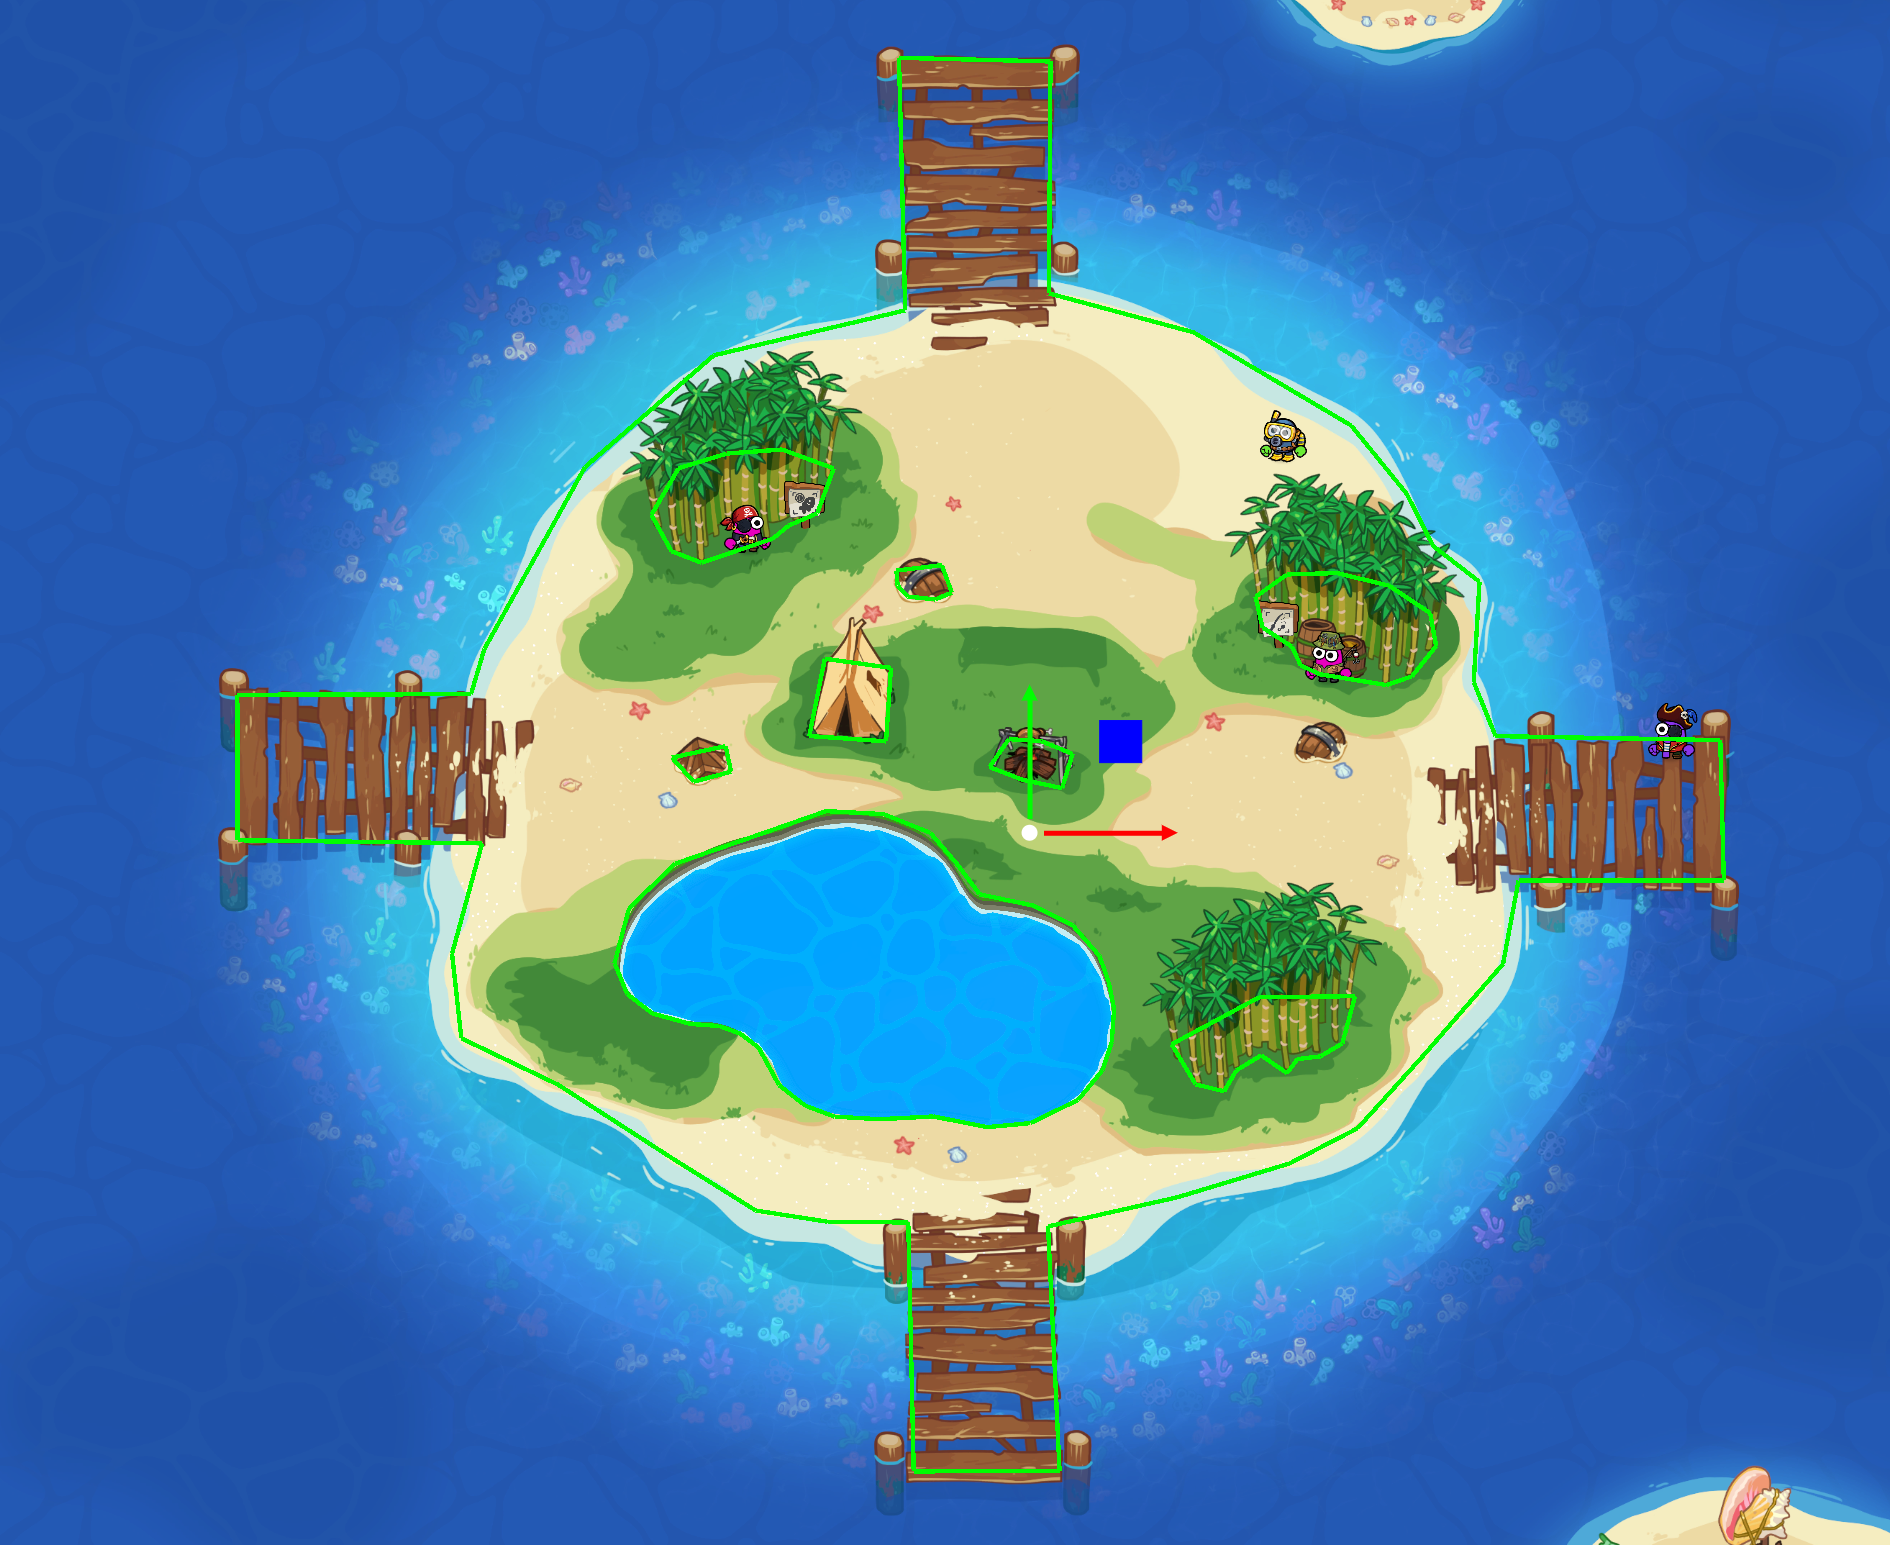
By default a Navmesh_Loop defines a walkable area as shown above. To punch holes in a navmesh to define unwalkable areas, simply toggle the FlipInsideOutside field on the Navmesh_Loop.
Here we have added a hole in the loop for the pond. And the final result would look something like this:
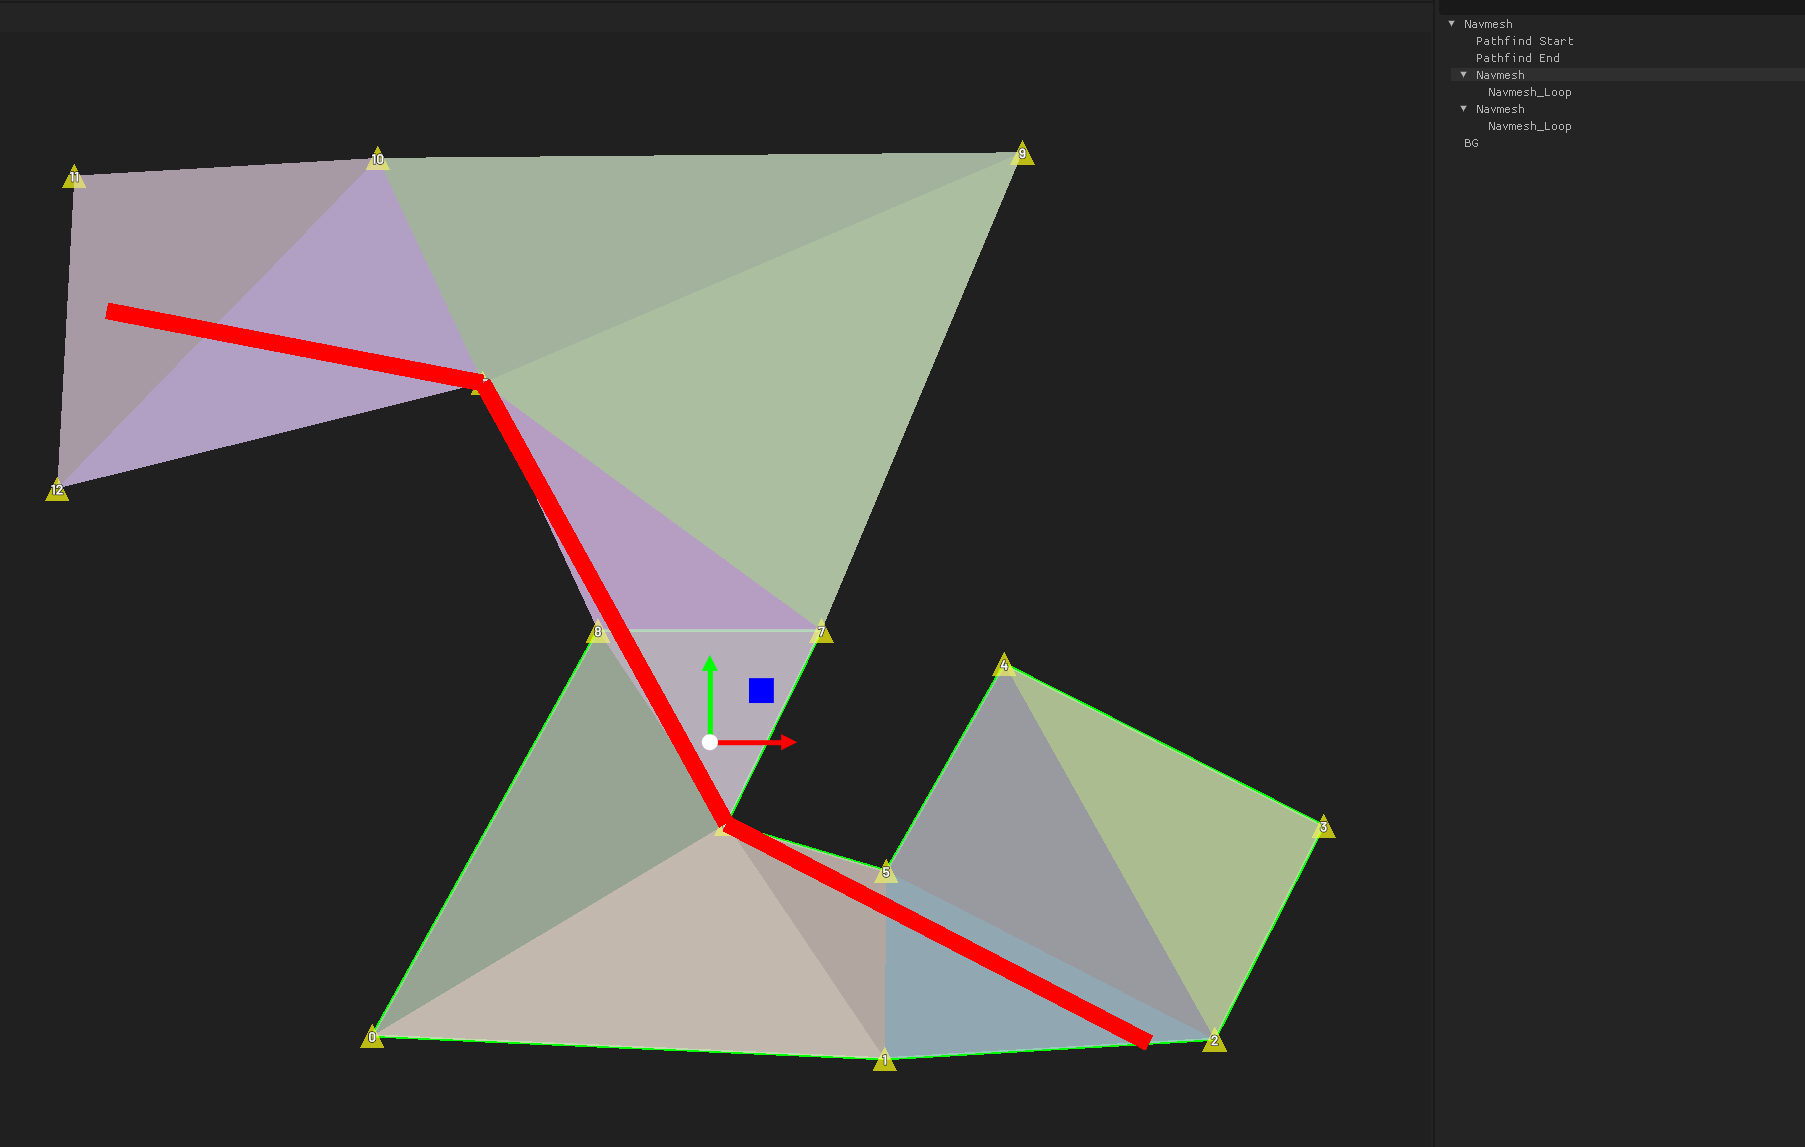
Pathfind_Tester
The Pathfind_Tester component is a useful (editor only) debugging tool that visualizes pathfinding between two points. It's particularly helpful when:
- Verifying navmesh connectivity
- Testing pathfinding across navmesh boundaries
- Debugging navmesh stitching issues
To use it:
- Add a
Pathfind_Testercomponent to an entity - Set the
Endfield to another entity in the scene - The component will automatically draw a red line showing the path between the two entities
The path will update in real-time as you move either entity, making it easy to verify that your navmesh is working correctly.
Code API Usage
Basic Navmesh Queries
// Find closest point on navmesh
Vector2 point = new Vector2(10, 10);
if (navmesh.TryFindClosestPointOnNavmesh(point, out Vector2 result))
{
    // Use result...
}
The code above could be used for spawning loot or enemies to make sure they are reachable by players by guaranteeing they spawn on the navmesh.
// Pathfinding
Vector2 from = new Vector2(0, 0);
Vector2 to = new Vector2(20, 20);
Vector2[] path = new Vector2[100]; // Pre-allocating path array is not necessary. TryFindPath will resize the
                                   // array if it is too small, hence the `ref path` below.
if (navmesh.TryFindPath(from, to, ref path, out int pathLength))
{
    // If `TryFindPath` returns true, `pathLength` is guaranteed to be >= 2
    // Use path[0] through path[pathLength-1]
    // path[0] is `from` snapped to the navmesh
    // path[pathLength-1] is `to` snapped to the navmesh
    // path[1] can be used as the next target to move towards
}
The code above would normally be put inside a Movement_Agent.CustomVelocityCallback. See the guide on movement agents for more information.
Modifying Navmesh Loops
// Get reference to navmesh loop
Navmesh_Loop loop = entity.GetComponent<Navmesh_Loop>();

// Read points
Vector2[] points = null; // As with Navmesh.TryFindPath(), you can pre-allocate this if you want and it will be resized if needed.
int count = loop.GetPoints(ref points);

// Modify points
points[0] = new Vector2(0, 0);
points[1] = new Vector2(10, 0);
points[2] = new Vector2(10, 10);
points[3] = new Vector2(0, 10);

// Update points
loop.SetPoints(points, 4); // You can do `SetPoints(points)` and it will implicitly do `SetPoints(points, points.Length)`.

// Toggle inside/outside behavior
loop.FlipInsideOutside = !loop.FlipInsideOutside;
Forcing Navmesh Updates
Modifying a Navmesh_Loop will automatically mark its parent Navmesh to be rebuilt, but sometimes you need to take matters into your own hands.
- If you are using colliders with
MakeNavmeshLoop.- Navmeshes don't keep track of the colliders that poked holes in it, so if you have a collider with
MakeNavmeshLoopset to true and then you move, resize, or otherwise modify that collider you will have to explicitly mark your navmesh to be rebuilt (or useRebuildImmediately()).
- Navmeshes don't keep track of the colliders that poked holes in it, so if you have a collider with
- If you modify the navmesh hierarchy in some way, such as making a new
Navmesh_Loopor destroying an existing one.
If you run into any other cases where a manual rebuild is necessary, let me know and I can add it here.
// Mark navmesh for rebuild at the beginning of next frame.
navmesh.MarkedForRebuild = true;

// Force immediate rebuild.
bool success = navmesh.RebuildImmediately();

// If you need an immediate rebuild and you are doing a lot of modifications, it would be best to do something like this:
foreach (var loop in Scene.Components<Navmesh_Loop>())
{
    // Make some changes. This will set MarkedForRebuild on its parent Navmesh.
    loop.SetPoints(/* ... */);
}
foreach (var navmesh in Scene.Components<Navmesh>())
{
    if (navmesh.MarkedForRebuild)
    {
        navmesh.RebuildImmediately(); // RebuildImmediately will set MarkedForRebuild to false.
    }
}
Navmesh Stitching
Navmeshes can be composed of multiple child navmeshes that are automatically stitched together. This is useful for:
- Breaking up large levels into smaller, more manageable navmesh pieces.
- Creating modular level sections that can be loaded/unloaded.
- Sharing navmesh data between prefabs.
- Making navmesh rebuilds faster. It is faster to stitch together multiple smaller navmeshes than to rebuild one giant navmesh.
To use navmesh stitching:
- Create an entity with a
Navmeshcomponent. - Create child entities with their own
Navmeshcomponents. - The parent navmesh will automatically:
- Combine all points from child navmeshes.
- Merge triangles while maintaining connectivity.
- Preserve neighbor relationships between triangles.
- Handle edge cases and boundary conditions.
Example of a stitched navmesh setup:
Parent Entity (Navmesh)
├── Child Entity 1 (Navmesh)
│   └── Navmesh_Loop
├── Child Entity 2 (Navmesh)
│   └── Navmesh_Loop
└── Child Entity 3 (Navmesh)
    └── Navmesh_Loop
When the parent navmesh is rebuilt, it will:
- Collect all points from child navmeshes.
- Preserve triangle relationships within each child navmesh.
- Calculate new neighbor relationships across navmesh boundaries.
- Create a single unified navigation mesh.
IMPORTANT: modifying a child navmesh does not trigger a rebuild of a parent navmesh. However, rebuilding a parent navmesh will automatically rebuild any children that have MarkedForRebuild as true. So after you modify a child navmesh, make sure MarkedForRebuild is set to true (recall that this happens automatically for loop.SetPoints(), but not automatically if you modify colliders with MakeNavmeshLoop set to true) on the child and then call RebuildImmediately() on the parent.
// Example of adding a new child navmesh to a parent
Navmesh parentNavmesh = ...;
Navmesh childNavmesh = Entity.Create().AddComponent<Navmesh>();
childNavmesh.Entity.SetParent(parentNavmesh.Entity);
Navmesh_Loop childLoop = Entity.Create().AddComponent<Navmesh_Loop>();
childLoop.Entity.SetParent(childNavmesh.Entity);
childNavmesh.SetPoints(...); // SetPoints will set childNavmesh.MarkedForRebuild to true.
parentNavmesh.RebuildImmediately(); // Could also do `parentNavmesh.MarkedForRebuild = true;` if
                                    // you are planning to do several modifications.
Ignore Colliders on Parent Navmesh
It is usually a good idea to set Navmesh.IgnoreColliders to true on your parent navmesh to prevent redundant work from being done. The colliders will still affect the children (if they themselves have IgnoreColliders set to false of course), so the parent will inherit those edges made by the colliders in the children. If IgnoreColliders is true on the parent, it will then go through and try to make all those edges again for no reason.
Stitching Example
Below I have two navmeshes underneath a parent navmesh. Each of the child navmeshes have a single navmesh loop.

If I move the two child navmeshes close enough that both the edge points overlap, they will be conjoined in the parent navmesh. You can see that the pathfind tester is able to find a path across the boundary, that's the set of red line segments here.
Note that each individual child navmesh will still just have its single navmesh loop on it, so if you want to make a pathfind query (TryFindPath()) or point query (TryFindClosestPointOnNavmesh()) make sure that you are doing it on the parent navmesh.
Navmeshes can be arbitrarily nested in this way, so this combined navmesh could be the child of yet another navmesh if you wanted. Stitching together multiple navmeshes is much faster than generating one large navmesh, so split up your navmeshes wherever possible if your level design permits it.
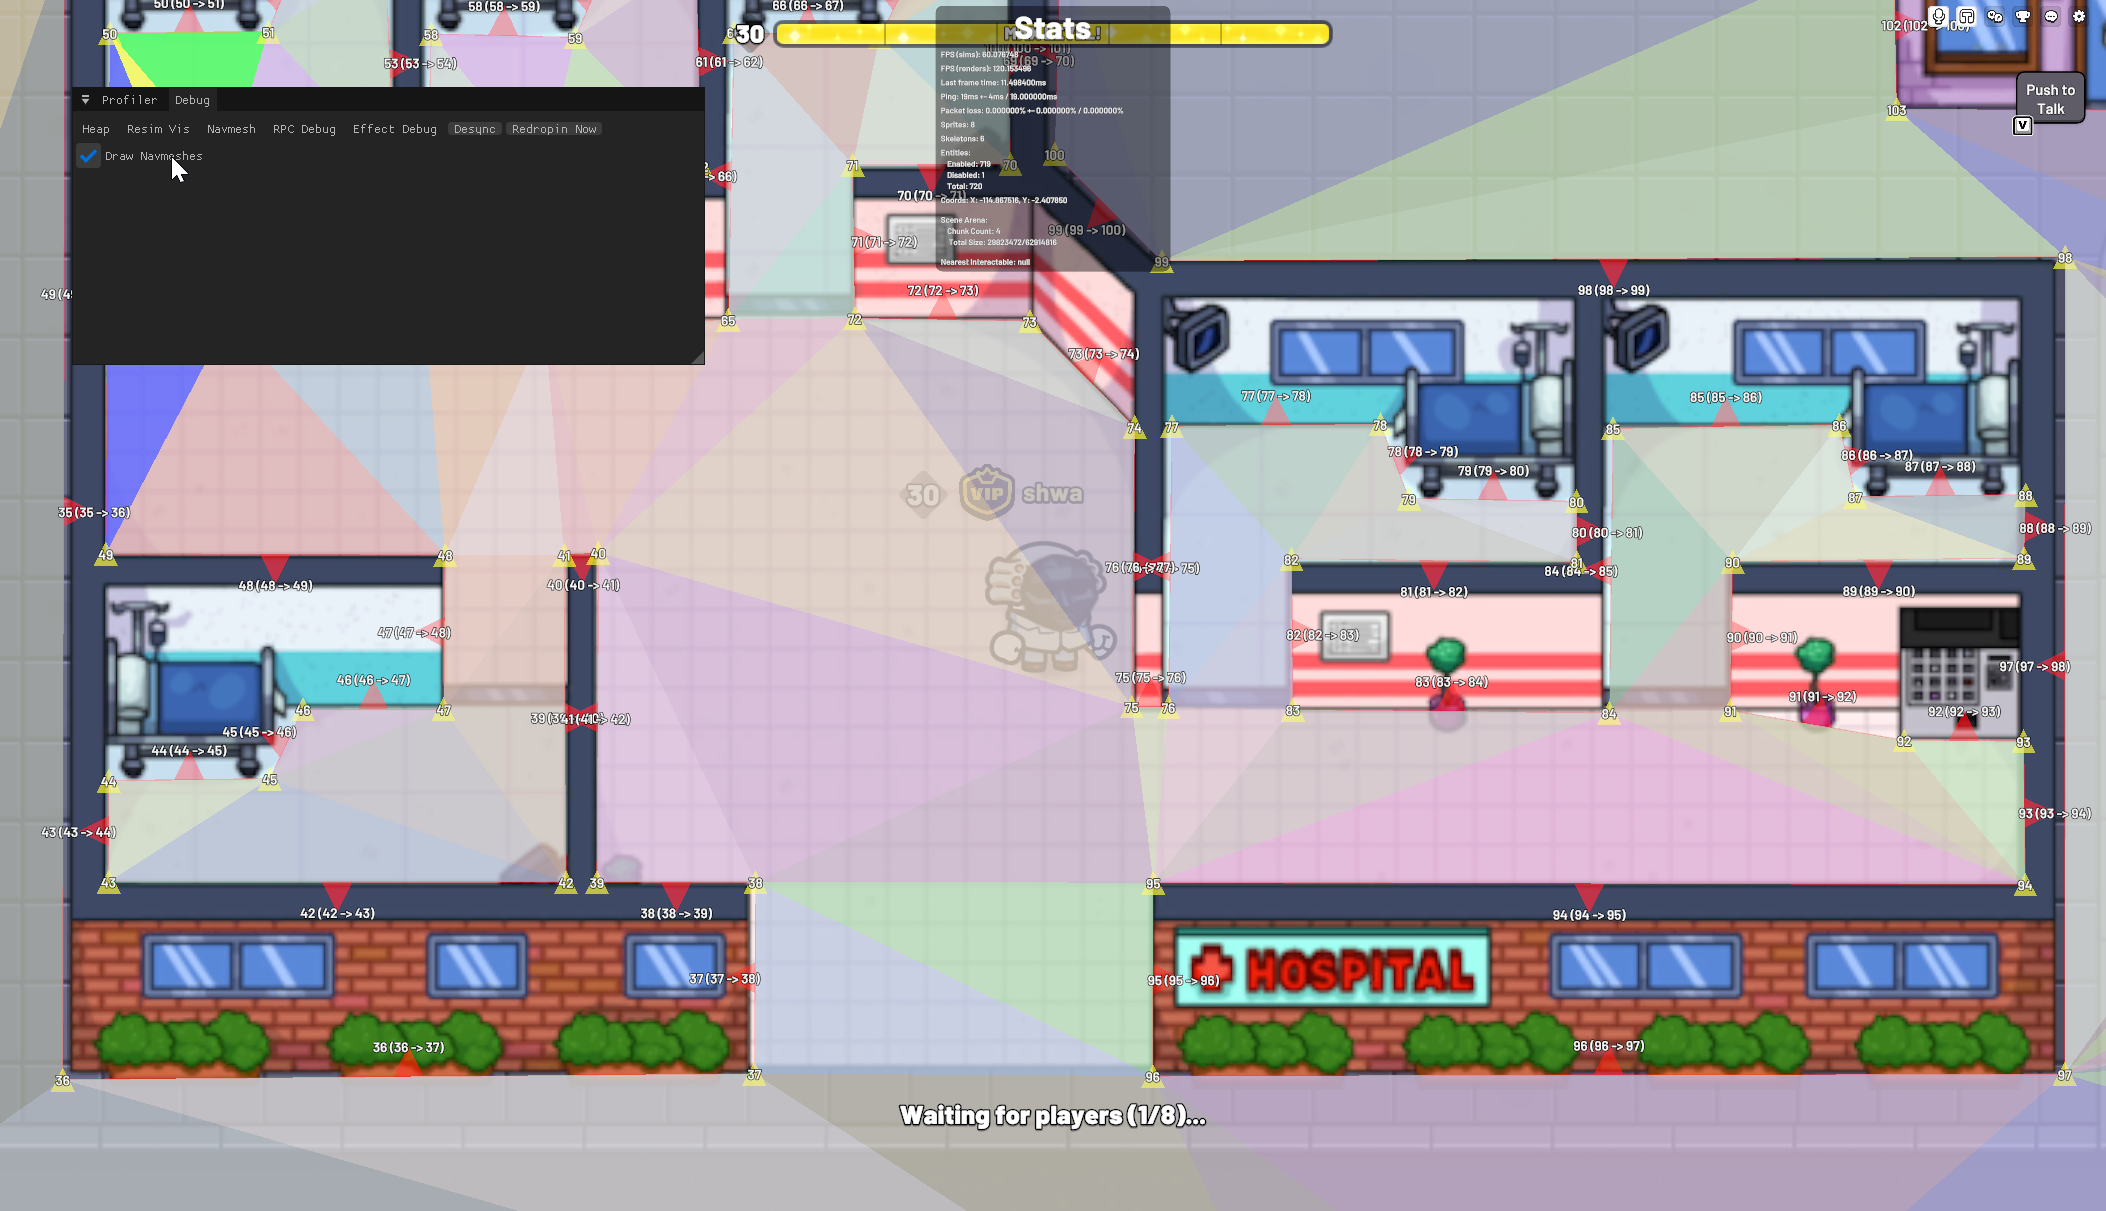
In-Game Visualization
In-game navmesh visualization can be toggled in the F3 menu under the Navmesh header.